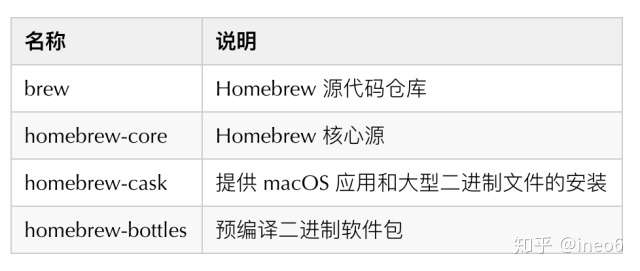
Homebrew是一款包管理工具,目前支持macOS和linux系统。主要有四个部分组成: brew、homebrew-core 、homebrew-cask、homebrew-bottles。

本文主要介绍Homebrew安装方式以及如何加速访问,顺便普及一些必要的知识。
1. 脚本说明
Homebrew默认安装脚本:
1 | /usr/bin/ruby -e "$(curl -fsSL https://raw.githubusercontent.com/Homebrew/install/master/install)" |
如果你等待一段时间之后遇到下面提示,就说明无法访问官方脚本地址:
1 | curl: (7) Failed to connect to raw.githubusercontent.com port 443: Operation timed out |
请使用下面的脚本:
1 | /usr/bin/ruby -e "$(curl -fsSL https://cdn.jsdelivr.net/gh/ineo6/homebrew-install/install)" |
上面脚本中使用了中科大镜像来加速访问。
安装使用到的脚本源码在此 homebrew-install ,仅修改了仓库地址部分
官方脚本无法使用的原因是http://raw.githubusercontent.com访问很不稳定,我上面提供的方案里是采用了jsdelivr CDN加速访问。
另外也可以采用写入hosts的方式,可以一定程度解决GitHub资源无法访问的问题,我也写了一篇操作文章,有需要可以阅读下。
2. 安装说明
1 | /usr/bin/ruby -e "$(curl -fsSL https://cdn.jsdelivr.net/gh/ineo6/homebrew-install/install)" |
如果命令执行中卡在下面信息:
1 | ==> Tapping homebrew/core |
请Control + C中断脚本执行如下命令:
1 | cd "$(brew --repo)/Library/Taps/" |
cask 同样也有安装失败或者卡住的问题,解决方法也是一样:
1 | cd "$(brew --repo)/Library/Taps/" |
成功执行之后继续执行前文的安装命令:
1 | /usr/bin/ruby -e "$(curl -fsSL https://cdn.jsdelivr.net/gh/ineo6/homebrew-install/install)" |
最后看到==> Installation successful!就说明安装成功了。
最最后执行:
1 | brew update |
3. 如何卸载Homebrew
使用官方脚本同样会遇到uninstall地址无法访问问题,可以替换为下面脚本:
1 | /usr/bin/ruby -e "$(curl -fsSL https://cdn.jsdelivr.net/gh/ineo6/homebrew-install/uninstall)" |
4. 设置镜像方法
brew、homebrew/core是必备项目,homebrew/cask、homebrew/bottles按需设置。
通过 brew config 命令查看配置信息。
4.1 中科大源
1 | git -C "$(brew --repo)" remote set-url origin https://mirrors.ustc.edu.cn/brew.git |
注意bottles可以临时设置,在终端执行下面命令:
1 | export HOMEBREW_BOTTLE_DOMAIN=https://mirrors.ustc.edu.cn/homebrew-bottles |
4.2 清华大学源
1 | git -C "$(brew --repo)" remote set-url origin https://mirrors.tuna.tsinghua.edu.cn/git/homebrew/brew.git |
4.3 恢复默认源
1 | git -C "$(brew --repo)" remote set-url origin https://github.com/Homebrew/brew.git |
homebrew-bottles配置只能手动删除,将 ~/.bash_profile 文件中的 HOMEBREW_BOTTLE_DOMAIN=https://mirrors.xxx.com内容删除,并执行 source ~/.bash_profile。
5. 其他
5.1 cask
目前cask是从GitHub上读取软件源,而GitHub Api对匿名访问有限制,如果使用比较频繁的话,可以申请Api Token,然后在环境变量中配置到HOMEBREW_GITHUB_API_TOKEN。
在.bash_profile中追加:
1 | export HOMEBREW_GITHUB_API_TOKEN=yourtoken |
注意:因为cask是基于GitHub下载软件,所以目前是无法加速的。
6. 总结
在前面的过程中我们把brew和homebrew-core的地址都指向到中科大镜像。
原理是通过修改install脚本,在里面预设镜像地址来做到的。
1 |
|
最后不完美的地方是我们只能预设brew镜像,没找到比较好的办法预设homebrew-core、homebrew-cask的git地址。
参考文章
brew 安装 redis 和 mysql
mysql
- 安装homebrew
- brew install mysql 安装mysql
安装完成之后,可以运行命令启动mysql服务
1 | mysql.server start |
然后输入命令设置密码
1 | mysql_secure_installation |
设置完成之后,进入mysql服务
1 | mysql -uroot -p |